
Maintenance & Care
How to Floss with Braces: Every Method, Ranked by Speed (2026 Guide)
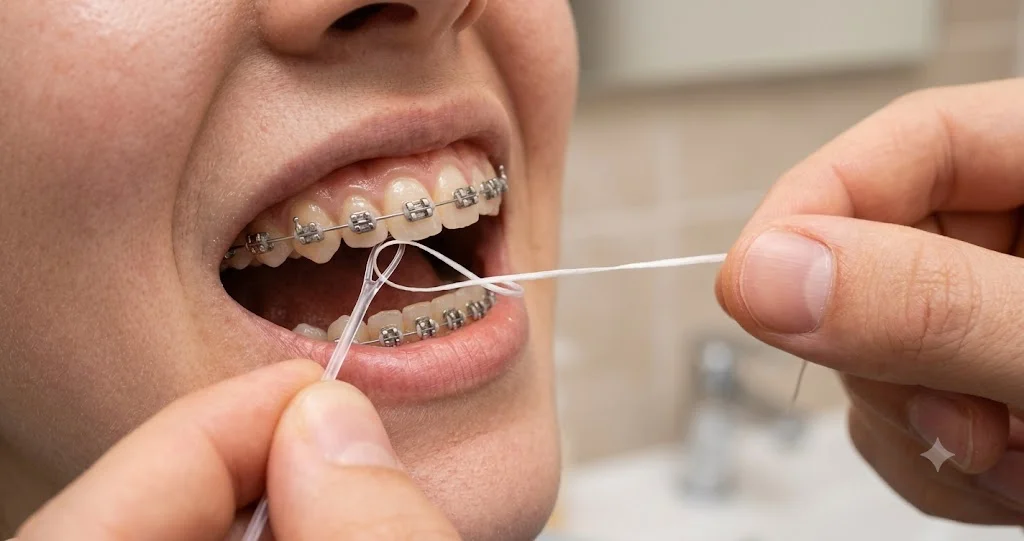
Quick Answer
Thread standard floss under the archwire using a floss threader, then slide it between each pair of teeth and curve it into a C-shape against each tooth surface — cleaning the contact points and subgingival pockets where gum disease begins. The full process takes about 5 minutes. A water flosser cuts that to 60 seconds but cannot replace the mechanical scraping action of floss.
Part of our complete Maintenance & Care Guide.
Flossing before braces: 30 seconds, easy, you have done it your whole life.
Flossing with braces the first time: 12 minutes, a tangled mess of floss threaders, aching gums, and serious questions about whether this is actually necessary.
Here is the answer: yes, it is necessary. In fact, flossing matters more with braces than without them, because the brackets and wire create new traps for plaque in areas that brushing will never reach. This guide shows you exactly how to do it efficiently — starting with the most effective method and covering every shortcut available.
Why Flossing Is More Important with Braces
Flossing with braces is essential because archwires trap food particles and obstruct natural saliva cleansing at tooth contact points. Unflossed plaque causes interproximal white spot lesions, swollen gingivitis, and cavities.
Without braces, the spaces between your teeth are accessible to the toothbrush from the front and back. They are not perfectly cleaned by brushing, but the exposure allows saliva to do much of the mechanical cleaning work.
With braces, the archwire runs across the front of all teeth. This creates a barrier that:
- Traps food in the space between the wire and the gum
- Increases the number of surfaces plaque can colonize
- Blocks saliva from naturally cleaning the contact points between teeth
Without flossing, plaque sits undisturbed at the contact points and below the gumline for 24 hours at a time. This causes:
- Interproximal white spot lesions — decalcification between teeth, not just around brackets
- Gingivitis — gum inflammation and bleeding that can advance to permanent bone loss (periodontitis) if untreated during a 2-year treatment course
- Interproximal cavities — the most common site of new decay during orthodontic treatment
Clinical research shows that patients who floss consistently have significantly less gum bleeding and shallower periodontal pocket depths than those who do not.
Method 1: Floss Threader (Most Effective)
Using a floss threader involves threading 18 inches of standard floss beneath the archwire and guiding it up between contact points in a C-shape. Scraping subgingival plaque off each tooth takes about 5 minutes.
The floss threader is a rigid plastic loop that works like a sewing needle for dental floss. It allows you to thread standard floss under the archwire and into the contact point between teeth.
What you need: 18 inches of standard floss + a floss threader (available at any pharmacy — GUM and Oral-B make common versions, or use pre-threaded varieties).
Step by step:
- Thread one end of your floss through the loop of the floss threader.
- Push the pointed end of the threader under the archwire between two brackets, from the front of the wire to the back.
- Pull the threader through until the floss is behind the wire and hanging between the two teeth.
- Hold the floss with both hands. Gently slide it up between the teeth until it reaches the gumline.
- Curve the floss into a C-shape against one tooth. Slide it gently below the gumline — 1 to 2 mm is enough. Scrape downward along the tooth surface with slight pressure to remove the adherent plaque film.
- Move the floss to the adjacent tooth. Curve into a C-shape against that tooth surface. Scrape down.
- Gently pull the floss out from between the teeth — do not snap it through, which can injure gum tissue.
- Remove the threader from the wire, re-position between the next pair of teeth, and repeat.
The first few times, this takes 8 to 12 minutes for a full mouth. Most patients get it down to 5 minutes within two weeks of daily practice.
Method 2: Orthodontic Flossers (Fastest Traditional Method)
Orthodontic flossers feature a thin, flat arm that slides behind archwires without threading, enabling quick 2-to-3-minute flossing. They offer single-handed convenience, making them ideal for school or work.
Orthodontic flossers — the most well-known brand is Platypus Orthodontic Flossers — have a thin, flat arm specifically designed to slide behind the archwire without threading. Push the flat arm under the wire, position the floss segment between the teeth, and use it like a standard flosser.
- Advantages: No threading required — saves 2 to 3 minutes per session. One-handed use. Easy to carry in a bag or pocket for after-lunch flossing.
- Disadvantages: The floss segment is shorter, making the C-shape technique on tight contact points harder. The fixed angle means some rear molars are awkward to reach.
For most patients — especially those who struggle with threaders — orthodontic flossers are the right choice to build the habit first. A faster method that actually gets done nightly is more effective than a thorough technique that gets skipped.
Method 3: Water Flosser (Best Supplement)
A water flosser uses pressurized water streams to flush food debris from brackets and massage swollen gums in 60 seconds. While highly effective as a supplement, it cannot replace mechanical string flossing.
The water flosser (Waterpik is the leading brand; Oral-B and Panasonic make competing models) uses a pressurized pulsating stream of water to flush food particles and disrupt plaque around brackets and wires.
What water flossers do well:
- Flush food debris from bracket bases, wire grooves, and around molar bands
- Reduce gingival inflammation — pulsating action massages gum tissue and increases circulation
- Clean under the gumline at accessible pocket depths
- Complete a full mouth in 60 seconds
What water flossers cannot do:
- Remove the adherent plaque biofilm from tooth contact points — this requires the mechanical scraping action of floss. Water pressure alone cannot dislodge established plaque film.
The right approach: Use a water flosser as a supplement to string floss, not a replacement. A sensible nightly routine: floss threader or orthodontic flosser first (3 to 5 minutes), then 60 seconds with the water flosser to flush residual debris and massage the gums.
The Waterpik WP-660 is the most commonly recommended model for orthodontic patients. It includes an orthodontic tip specifically designed to clean around brackets.
When to Floss
Floss with braces at least once daily before bedtime after your final brushing session. Bedtime flossing eliminates interproximal plaque before overnight saliva reduction permits bacterial acid attack.
Minimum: Once daily, before bed.
Flossing at night is most important for two reasons:
- Saliva flow drops significantly overnight — the protective buffering effect of saliva is reduced, letting acid from residual plaque sit directly on tooth surfaces for 6 to 8 hours.
- Any plaque not removed before bedtime has the entire night to calcify and harden into tartar — which cannot be removed by brushing or flossing and requires professional scaling.
Ideal: Morning and night. Flossing twice daily dramatically reduces interproximal plaque and gingival inflammation compared to once daily in patients with established gingivitis.
Signs You're Flossing Correctly
Proper flossing produces firm, pink gums with minimal bleeding after the initial 2-week adjustment period. Persistent heavy bleeding or swollen tissue indicates active gingivitis requiring consistent daily flossing.
Healthy signs:
- Gums are pink and firm, not red or swollen
- Minimal or no bleeding after flossing — some bleeding is normal in the first 1 to 2 weeks if you have not flossed regularly, and should stop as gums heal
- No persistent bad breath despite brushing
Signs something is wrong:
- Heavy bleeding every time you floss (not just the first few sessions) — a sign of established gingivitis
- Gums visibly swollen around the base of brackets — localized inflammation
- A loose feeling in one or more teeth — rare, but worth mentioning to your orthodontist
The "bleeding means stop" myth: Many patients interpret gum bleeding as a signal to floss less. This is backwards. Bleeding gums indicate gingivitis — inflamed tissue with a bacterial infection at the gumline. The treatment is better, more consistent flossing, not less. Most gingivitis-related bleeding resolves within 7 to 14 days of daily flossing.
Building the Habit
Building a daily braces flossing habit relies on starting with fast orthodontic flossers and keeping supplies visible on the bathroom counter. Coupling flossing with bedtime media routines eliminates resistance.
The biggest obstacle to flossing with braces is time. The threader method is undeniably slower than pre-braces flossing, and the mental resistance to a 5-minute routine (versus the 30-second pre-braces version) is real.
Practical strategies:
- Floss while watching TV or a video — the distraction makes the time irrelevant
- Keep flossers on the bathroom counter — visibility serves as a cue; floss kept in a drawer gets forgotten
- Start with orthodontic flossers rather than threaders for the first few weeks — the lower time investment makes the habit easier to build; switch to threaders once flossing is automatic
- Water flosser on the counter next to the sink — convenience makes it the default for a quick supplement after brushing
Once flossing is consistent, pair it with the right brushing technique. Read our guide on How to Brush Teeth with Braces to complete your daily routine.